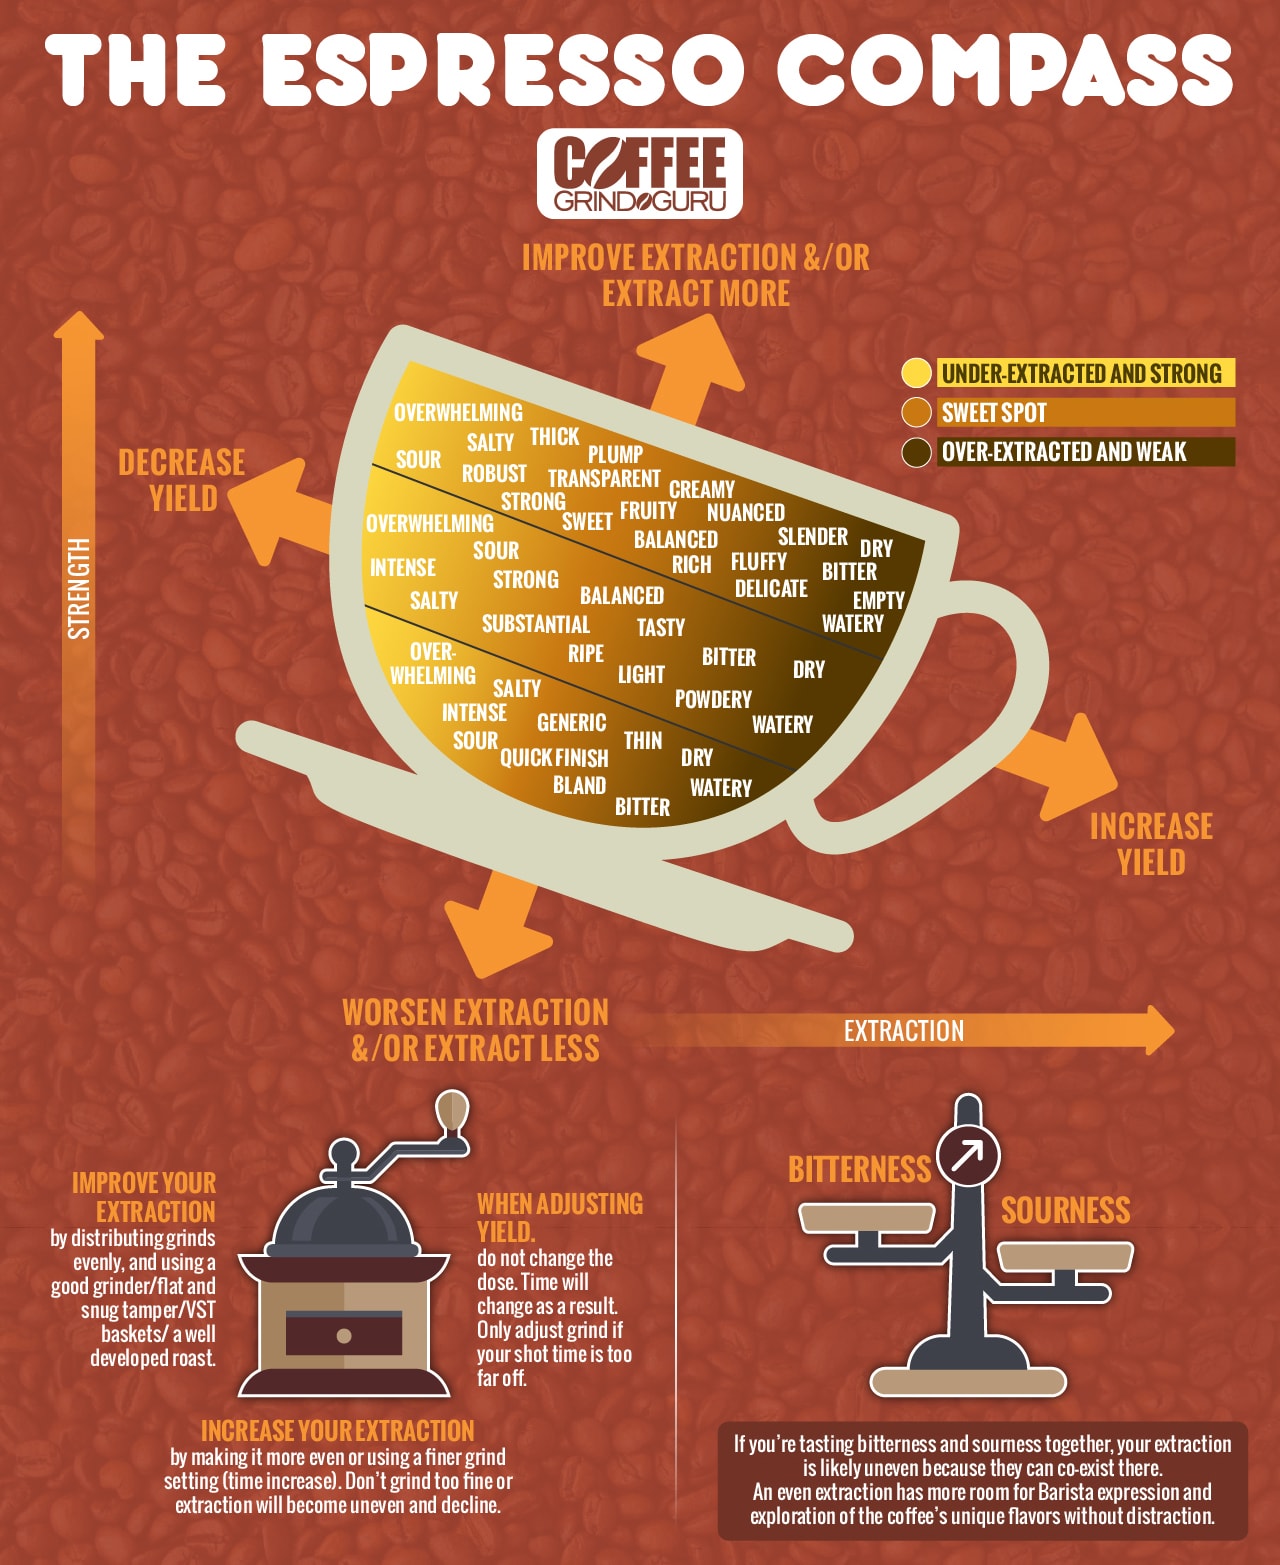
Are you a coffee lover looking to take your passion to the next level? If so, then it’s time to learn about the Espresso Compass.
This clever tool will help you achieve the perfect espresso shot every time, by guiding you through the four key variables that affect espresso extraction: dose, yield, grind size, and brew time.
In this blog post, we’ll dive deep into each of these variables and explain how they impact the flavor and quality of your espresso.
We’ll also teach you how to use the Espresso Compass to dial in your shots like a pro. So grab your favorite mug and get ready to become an espresso aficionado!
The Espresso Compass

What Is an Espresso Compass?
The Espresso Compass is a tool that helps baristas and coffee lovers to understand how to balance four key elements in espresso-making: dose, yield, time, and grind size. This tool can help achieve a perfect shot by guiding adjustments to these factors for a balanced and tasty result.
How to Use the Espresso Compass
Using our Espresso Compass is simple.
Start by measuring the weight of your coffee grounds and tamping them into your portafilter. Then, place the portafilter onto your espresso machine and begin extracting the shot. While the shot is pulling, observe the color and texture of the espresso as it flows out of the spout.
Use the Espresso Compass to adjust your grind size and brewing time until you have achieved the desired taste and consistency. With practice, you can master the art of making exceptional espresso shots every time using this helpful tool.
NOTE: espresso should have a mouthfeel as well as a crema strong enough to support sugar for a brief second before falling to the bottom of the demitasse
- Mouthfeel: this is what wine experts are looking for when they sip and slurp their vino. With espresso, however, you should not encounter any bitter notes and you should have a nice weight on your tongue.
- Crema: this is that gorgeous, red-ish layer on top of your espresso that is, essentially, oxidized bean (we’ll get more into this later on, promise!)
- Demitasse: this is a fancy little cup you can buy online and which should be capable of catching 1- or 2-ounce shots
Remember that if you are looking for a coffee compass instead we have that too! A brewed coffee compass is a similar tool but designed for pour-over coffee and helps you to adjust the water temperature, pour rate, coffee-to-water ratio, and grind size.
Common Brewing Issues and How to Fix Them Using the Espresso Compass
If your brew runs through (too fast) then you likely have your coffee grinder set too high, or have granules that are allowing water to rush through…so dial it back. On the other hand, should your shot take forever, then you’ve got sand-like grind settings that need to go up a bit.
If you forget, then just reference that lower, left-hand area of the espresso compass! Remember, a finer grind can help slow down the shot and improve the taste of your coffee.
On the lower, right-hand quadrant of the chart, we get back to mouthfeel and crema. In order to get a full bodied taste without all that bitterness, check your extraction time and amount.
Your shot should weigh between 15- and 16-grams and your shot should complete between 25- and 30-seconds. It is important to maintain the right brew ratio for the perfect shot. Always make sure you are using the right brew ratio.
Final Thoughts
The Espresso Compass is a great tool for those aiming to perfect their espresso making skills by taking the guesswork out of how to improve their espresso.
Understanding the four key variables of dose, yield, grind size, and brew time can be overwhelming, but the Espresso Compass simplifies the process by providing a clear guide for achieving the perfect shot.
By dialing in your shots like a pro with the Espresso Compass, you can consistently make delicious, high-quality espresso that will impress even the most discerning coffee drinkers.

